When you sit down to make a dress in real life, what's the first thing you do? OK, I know, you look all over to find where you left your scissors. After that, though .......
Right! You get a tracing paper pattern -- one you bought at the fabric store or drew yourself -- and you cut it out and pin it to the fabric. The pattern acts as your guide for cutting the fabric itself, so that you don't make costly mistakes chopping away freehand with your scissors.
In this tutorial, I want to show you a similar approach to creating clothing for Second Life. My approach is different from the one you may have seen Robin Wood or Natalia Zelmanov describe on their web sites (
http://www.robinwood.com/Catalog/Technical/SL-Tuts/SLTutSet.html and
http://www.mermaiddiaries.com/2006/11/day-51-little-black-dress-and-creating.html), and it offers different advice from what you often read in the SL Texture Tips Forum. Those resources focus on the alpha channel as a way to create transparency -- which it is -- but I find it more useful to think of an alpha channel as a cutting guide, like your tracing paper dress pattern. This emphasis is not necessarily
better, but it's
different -- and maybe different in a way that will make more sense to you, as it has for me.
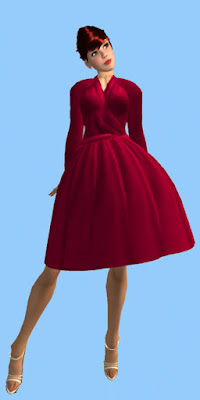
I'm going to make the top for a very simple dress with a half-wrap closure. It's the one in this photo, a fairly conservative red coquette that you can find in my shop on Only Yesterday. I'll be using Photoshop, but the same general approach would apply in any graphic design program that can handle layers and channels. The end product will be a TGA file.
My primary focus is on how to use an alpha channel image, so once I have done that I will zip through the remaining fun, artistic steps that create folds, shading, and other elements that make the dress come alive.
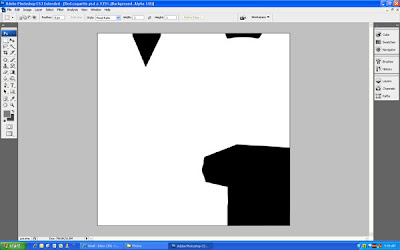
I can't pop down to the fabric store and buy a Simplicity pattern, so Step One is to draw my own. This crucial artistic step defines the shape of the dress. I do it by opening a copy of the avatar upper body template, creating a new layer just above the Background layer, and filling it with black. Think of this like wrapping a dressmaker's mannequin with a big sheet of paper. I find it easier to use tracing paper, so let's set the Opacity of this new layer to about 60%. It looks like this:
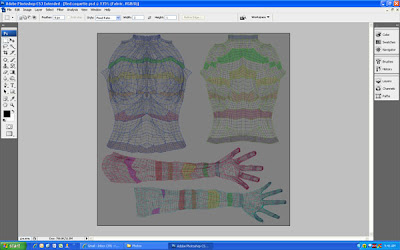
The avatar template is visible here because it is in layers above the one I just created. Reducing the opacity of the new layer just makes the template easier to see.
To make the pattern for this dress, I need to cut away portions of the new layer to define the neckline and the sleeve length, so I draw a path around each of those areas (see the red arrows). I have shown paths around all three areas to be cut in this composite screen shot but, in fact, I drew and cut out each of them separately. I just put them together in a single photo here for illustration.
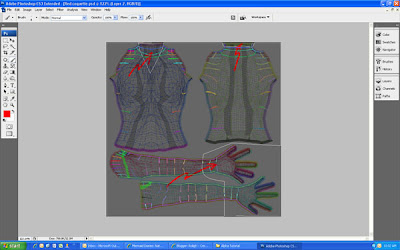
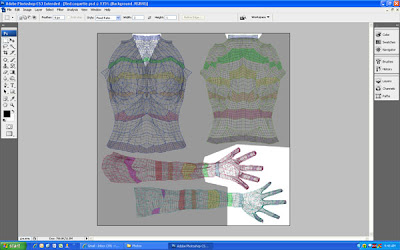
By the way, it's tempting to draw paths freehand, but don't do it. Your hand is probably steadier than mine, but you'll still get wiggles that make a sloppy product in the long run. Instead, use your basic Pen tool to set anchor points all the way around an area and then use the Point Convert tool to drag the handles at each anchor point and create a smooth path. Then, right click inside the area and select Make Selection from the drop-down menu that appears. Be sure that the Anti-aliased box is checked and that the feather radius is set to zero, and click OK. Finally, choose Edit >> Clear to cut away the pixels inside the selected area. When I do that in each of the three areas for this dress, the layer looks like this....
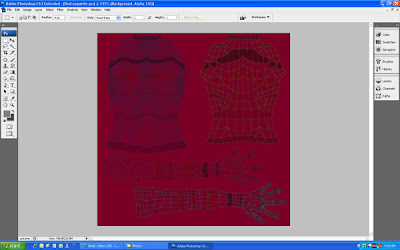
I have just created a mask. I'll use it a couple of times. First, I need it to make a pattern -- the alpha channel. So, with the mask active, I right click the layer thumbnail and select pixels ... then Select >> Save Selection. In the pop-up window, I check to be sure that it says New Channel and then click OK. Voila! I have made a pattern.
To see what the pattern looks like, I can go to the Layers/Channels/Paths palette and select the Channels tab. I turn off the RGB channels and turn the new Alpha channel on. The screen image looks like this....
This really is a dress pattern. The black areas mark out places where I don't want any fabric in the dress and the white areas are places where I do want it. Remember that the avatar template also acts as a pattern of sorts. We don't need to have black "cutouts" in the alpha channel for anything that is outside the avatar body, because the template takes care of those areas for us.
What I'm about to say is a very important point to remember. Because the alpha channel is a pattern, I can turn off the mask layer I just created. I won't need it for cutting. In fact, I don't need to do any more cutting in Photoshop at all. The alpha channel will do it all for me.
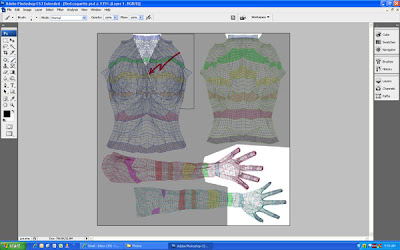
Let's go back to the Layers tab to see what this means in practice. (Before I leave the Channels tab, I click the RGB eye icon ON and the alpha channel icon OFF.) I'm going to add a new layer above the mask I just created and then fill it completely with my fabric, like so..
The fabric for this dress is very simple. It's just a deep red that I have textured lightly with the noise filter and then blurred with a Gaussian blur to give it a soft look. If I had chosen a fabric with a print, I would have overlain different sections of the work area with pieces of fabric that I had rotated, stretched, or tweaked in other ways so that the print would line up across seams in the final dress.
(I'll do this in another tutorial, and will also deal with using lace, which is a variation on the same theme.) Even then, though, I would be sure that the fabric layer was completely full before moving on.
Why is this important? First of all, cutting anything on the fabric layer is a waste of time. The pattern I made in the alpha channel is going to take care of all the cutting, so why do it twice? More important, though, cutting the fabric layer can create the dreaded "white halo" problem.
Let me explain, in inelegant terms that are technically imprecise but may help you to visualize the problem...
< < < < < < < > > > > > > >
In real life, suppose you gave a dress pattern to an assistant and said, "Put this pattern on that fabric and cut it out," but you gave the assistant a piece of fabric that was already trimmed to the right shape. This is a confusing command. Instead of complaining that the fabric was already cut, though, the assistant might try to obey by pinning a scrap of some other fabric under yours so she would at least be cutting something. Looking at her work later, you would be able to see the trimmed fabric you gave her, unchanged, and the edge of the extra scrap she cut.
A similar thing happens when your virtual pattern -- the alpha channel -- contains "cut here" information, but there's nothing to cut because you placed pre-trimmed shapes in the otherwise empty fabric layer of your image file. The graphics routine that processes your image, trying to obey, adds a little scrap of information -- pixels filled with white -- so that it has something to cut. The result is that your dress ends up with an ugly white halo instead of nice, clean edges.
As I said, this explanation isn't rigorous, so don't write to complain that I have misrepresented the finer technical details of the process. My point is simply this ... the white halo is created because you have told the graphics routine to use an alpha channel image to cut something that isn't there.
Graphic artists have many clever ways to remove the ugly white halo, all of which involve putting something into "empty" pixels that lie where the alpha channel "pattern" says to cut. These methods are all "additive," because they are putting new data into the image. (Some artists avoid the issue altogether by creating a PNG image, which uses a different approach.)
That seems like extra work to me, though. Why go to the trouble of cleaning up a problem that you could have avoided by leaving the fabric big enough in the first place? Don't use the mask to cut out things on the fabric layer. When you do that, you leave an edge that has "empty" pixels along it, inviting a white halo. Leave the fabric alone and let the alpha channel do its job.
< < < < < < < > > > > > > >
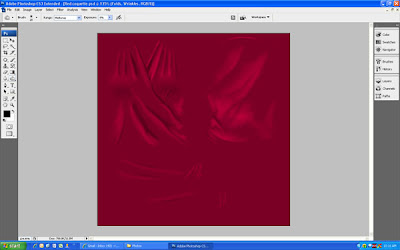
Back to the project, the rest of which is purely artistic. I begin adding extra layers above the fabric layer to define shadows, folds, and wrinkles, and to create the shape of the collar and simulate the way the dress wraps around the torso. On another dress, I might have layers for buttons, stitching, pockets, or other accessorizing features.
Here's a layer created simply to add shading and highlights to give the bustline better shape, for example. I start with a new layer, fill it with 50% gray and set the layer mode to Overlay. Then I use a series of soft brushes with the Dodge and Burn tools to produce the gentle gradations you see here.
I use the same methods to create the draped appearance where the front of the dress crosses over itself. This is a bit more complicated, because I want to create an impression of visual depth, so it's clear that the dress is wrapping around. To do this, I use a copy of the original mask as a starting point and cut along a continuation of the neckline to create a new mask that separates the left and right portions of the bodice.
This new mask makes it easy for me to do delicate texturing, especially along the line that defines that wrapped edge. Here's a close look at several merged layers defining folds and wrinkles on the right side of the torso .......
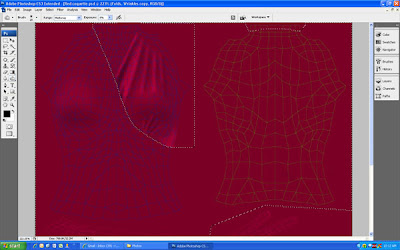
and a look at a similar collection of merged layers that define the left side. .....

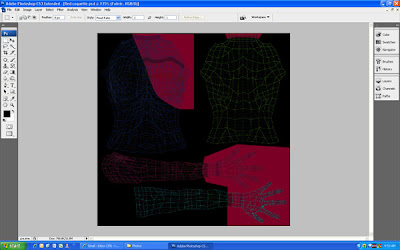
Before uploading, I turn off any layers that should not be visible in the final texture. This includes all avatar template layers and any masks that I may have forgotten to close. The image on my screen looks like this ...
I can double check at this point to be sure that the alpha channel is going to cut this image the way I intended. To do that, I click the Channels tab in the Layers/Channels/Paths palette and then make the alpha channel visible temporarily by clicking on its icon.

As you can see, the alpha channel is prepared to do the cutting it was designed for. When I upload this texture to SL, the image in the preview window will look just like this, except that the bright red areas will be replaced with the checkerboard background pattern that indicates they are transparent.
All that's left is to save this PSD file and then downsize it temporarily to 512 x 512 pixels so I can save a copy as a 32-bit TGA file for upload. I'm done!
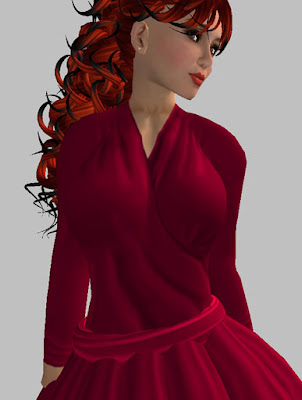
Here's the final product in world .....


 OK, this wasn't a wordy post, but I hope you liked the photos. I'm thinking of opening a new shop and using this style of posters to show my work ... maybe this summer. If so, I'll be sure to post the SLURL here so you know where to come.


